Week 10
Doodles, UX, and COVID
Just a week after returning to my weeknotes, it’s going to be a lighter one this week as Sarah and I managed to catch COVID. I spent a little time on Builds, but also took a some time off work-like projects to play around with ideas for my thermal printer and continue the Little Luggable Raspberry Pi 5 upgrade.
Builds
The first half of the week was spent trying to get Builds ready for a first private TestFlight beta—I’ve had a few friends express interest and I’d like to let them try it out. (If you’re also keen to test out an early beta, please get in touch.)
Getting Started and Adding Workflows
When I first started working on Builds, I was primarily interested in seeing if I could create something that improved my own daily development experience. As such, I put very little effort into the flow for adding GitHub Actions workflows to the app (a simple dropdown list was sufficient), instead focussing on the primary functionality of fetching and reporting statuses. Now that I’m planning to let others use the app, on-boarding becomes significantly more important.
Builds reports on branch-specific runs of GitHub Actions workflows. This means that any on-boarding flow needs to make it easy for users to select, for each of their repositories, pairings of workflows and branches.

Builds shows statuses for workflow runs on specific branches
My initial implementation for adding workflows presented users with a view containing three pickers allowing them to select a repository, workflow, and branch:

This proved slow and cumbersome, offering no overall context and making it easy to forget workflows or unintentionally add duplicates. It also translated incredibly poorly to iOS which offers no way to quickly navigate big pickers.

Pickers don’t scale well on iOS
With these failures modes in mind, I set about designing something better:

It’s actually quite hard to break down the many thoughts and iterations that went into this but, while I’m sure there are still improvements to be had, I’m pretty pleased with how it’s turned out. The main goal is to show users as much context as possible, making it quick to add and remove builds, and easy to see all available builds. Setting up the app from scratch multiple times during development has proven a great stress-test for this workflow and I’m happy with how it works.
One challenge in designing the experience was figuring out what to do with the explosion of per-branch workflow runs. For example, if a repository has 3 workflows and 5 development branches, that’s a possible of 15 workflow builds. After much experimentation, I’ve settled on showing workflow runs on only default branches by default and using a picker to allow users to add additional branches. This optimizes for the primary use-case where people are interested in understanding whether ‘main’ builds, but also accommodates projects with long running development or dedicated release branches.
Syncing Settings with SwiftData, CloudKit, NSUbiquitousKeyValueStore
Having decided I want to support both iOS and macOS, I put some time into thinking about the sync story—it’s incredibly jarring to have the same app on multiple devices but have to configure each individually and I want to avoid that.
I’d assumed my minimal needs would make this a perfect use-case for SwiftData but a lack of observer mechanisms outside of the SwiftUI lifecycle made it near-impossible to use for fetching statues in the background. I briefly explored using the CloudKit APIs directly but, in the end, settled on storing a simple array of workflow favorites in NSUbiquitousKeyValueStore—it seems good enough for my current lightweight needs and I can switch it out if I start to see syncing issues. I’ve been living on this implementation for about a week and it’s been rock solid.
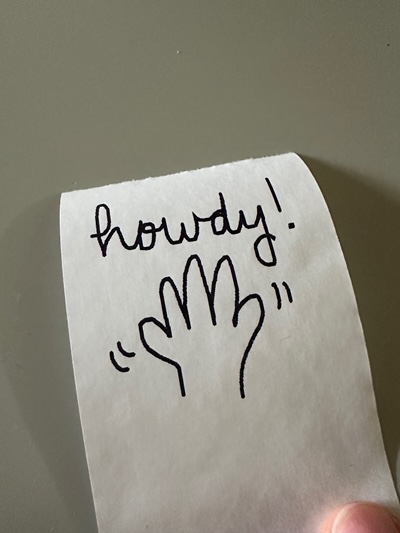
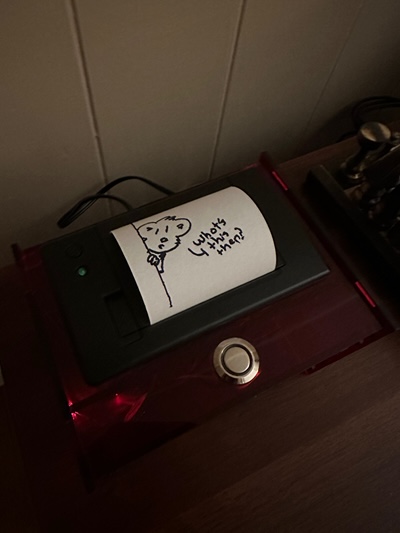
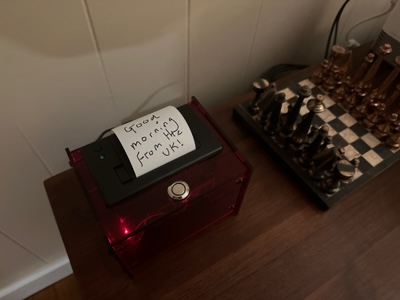
WriteMe
Early on in the pandemic, when we were all encouraged to quarantine mail, I put together a Raspberry Pi powered receipt printer based on Adafruit’s Internet of Things Printer. Press a button, and it would print out quarantine ‘release’ tickets to let us know when our mail could be opened. Since that time has passed, it’s been sitting unused on the shelf and I’ve been dreaming up things to do with it.
Spurred on by Dan Catt’s pen plotter art—especially his recent work focused on handwriting—I thought it might be nice to use the receipt printer as a way to help manifest digital things in the real world and try to bring back a little whimsy in the process. With that in mind, I created WriteMe.
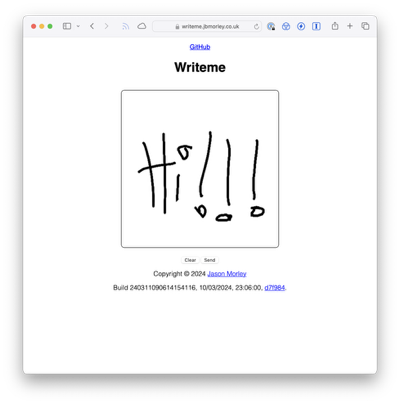
Writeme allows anyone to send a little doodle to my receipt printer. It’s quite possible I’ll come to regret this (gone are those heady early days when putting something like this on the Internet seemed like an unquestionably great idea), but hopefully it brings a little entertainment while it lasts.
It’s been fun to see what people have sent so far and I’m looking forward to a few more doodles.
Little Luggable
Just like last week, I spent a little time tweaking the Little Luggable.
When I originally built the Little Luggable, I picked up the Pimoroni Audio Amp Shim with a view to driving a built-in speaker but never quite managed to get it working. At the time I was using Manjaro on my Pi 4 so thought the issue might have been with the drivers, and eventually gave up. Since I’m now Raspberry Pi OS on my Pi 5 (for the moment at least), it seemed like a good time to try again. Just like my experience with Manjaro, the Pi would list the device but didn’t seem to be able to talk to it, with alsamixer complaining that it had ‘no controls’. Having read around a little, it seemed like the issue might be with the shim’s friction-fit connectors1 so I broke out the soldering iron. A few minutes later and I was enjoying the dulcet tones of a wilhelm scream at a loud 100% volume through MPlayer. Keen not to repeat that experience in a hurry, I broke out ScummVM and a few games instead.
Enjoying a bit of Riven on the Little Luggable
Much to my surprise the Little Luggable’s mono speaker sounds quite good—far better than most laptops and monitors.
-
Even the Pimoroni product page includes the comment, “[t]o ensure a robust connection, we’d suggest soldering the SHIM to your Pi’s GPIO pins (or a socket header) when you come to install it in your final project”. ↩