Weeknotes #4
Mondays seem to have become the day I write my weeknotes. It’s something I look forward to, providing a wonderful opportunity to tie up loose ends, take stock, and plan the coming week. This week’s notes have taken longer than usual—it’s Thursday as I put the finishing touches to them—but it’s still been a good exercise to reflect on what’s been going on.
Encouraged by the progress I made with software projects last week, I pressed ahead with my apps. Unlike hardware projects, where changing tools, or waiting on parts introduces natural pauses, software development will fill all the available time, and ultimately I spent more time than I would have liked on software, while my other projects languished.
In the background, I enjoyed auditing the MiSTer forums to gain some background knowledge while waiting for the parts for my own build to turn up, abandoned the Microdox build I mentioned last week (the boards don’t work well as well as advertised with low-profile key switches), and installed a new keycap set on my Planck.
Bookmarks
Since my hope is to iterate quickly (ideally pushing a release every day or two), I plan to integrate the Sparkle update framework to reduce the burden that cycle puts on users. Unfortunately, as I set about adding the framework, I realised I was in for a world of pain trying to do this with a Catalyst app (see issue #1482). So I set about building a dedicated macOS app.

I unexpectedly found myself building a new macOS app
Given Bookmarks is written almost entirely in Swift and SwiftUI, most of the cost of creating a dedicated macOS app was in project configuration—creating the new app target, and a framework to share common code between the iOS and macOS apps. That process took a couple days and, once in place, the macOS app itself went quickly and smoothly (there’s only about 4 macOS-specific files so far).
The process gave me the opportunity to flesh out my GitHub actions by adding automated tests to the iOS project and new framework. There are too few tests at the moment, but knowing they’re run on every commit is great motivation to add more in the future. I also started writing a manual test plan to ensure I don’t forget or break features along the way.
Building a SwiftUI app—especially one for macOS—is always a weirdly inconsistent experience: it’s unbelievably easy to get an app up and running, generally resulting in code that feels wonderfully concise; but as soon as you encounter something the framework doesn’t support, the cost goes up significantly, often requiring bridging into AppKit, or creating a nuanced workaround. I encountered one such issue last week with window frame autosaving.
If you’re familiar with macOS, you’ll know that it preserves the size and position of an app’s main window. It’s an incredibly useful feature, but getting it to work has always seemed a bit nuanced (you’ll find a myriad questions on Stack Overflow). In spite of that, the AppKit code is actually quite simple once you know how, simply requiring developers to set the autosave name when creating the main window:
window = NSWindow(...)
window.setFrameAutosaveName("Main Window")
window.makeKeyAndOrderFront(nil)
This code typically lives in the applicationDidFinishLaunching method of the application delegate, where the main window is created.
Moving to SwiftUI, it seems this would perfectly match the declarative style of the framework. For example, one might expect something like the following code to work:
struct BookmarksApp: App {

  var body: some Scene {
    WindowGroup {
      ContentView()
        .frameAutosaveName("Main Window")
    }
  }

}
Unfortunately, as far as I can see, SwiftUI does not expose any of the window frame autosave functionality. It’s also incredibly difficult to hook into the window creation lifecycle when using the new app structure, which manages windows on your behalf. After copious experimentation, I found I was able to abuse the lifecycle of a hosted NSView to let me manually set the window frame during construction, and subsequently observe and save frame changes:
public class FrameAutosaveNSView: NSView {

  var name: String

  init(name: String) {
    self.name = name
    super.init(frame: .zero)
  }

  public override func viewDidMoveToWindow() {
    // Restore the frame if there's one in user defaults.
    if let frameDescriptor = UserDefaults.standard.string(forKey: name) {
      window?.setFrame(from: frameDescriptor)
    }
    // Observe frame changes, and save them in user defaults.
    NotificationCenter.default.addObserver(forName: NSView.frameDidChangeNotification,
                                           object: nil,
                                           queue: nil) { (notification) in
      guard let frameDescriptor = self.window?.frameDescriptor else {
        return
      }
      UserDefaults.standard.setValue(frameDescriptor, forKey: self.name)
    }
  }

}
In classic SwiftUI fashion, once all the nastiness is contained in an NSView subclass, you can hide it away in a clean API:
public struct FrameAutosaveView: NSViewRepresentable {

  public class FrameAutosaveNSView: NSView {
      ...
  }

  public class Coordinator: NSObject {
    ...
  }

  let name: String

  public init(_ name: String) {
    self.name = name
  }

  public func makeNSView(context: Context) -> FrameAutosaveNSView {
    return FrameAutosaveNSView(name: "name")
  }

  public func updateNSView(_ view: FrameAutosaveNSView, context: Context) {
    view.name = name
  }

  public func makeCoordinator() -> Coordinator {
    return Coordinator(self)
  }

}

struct FrameAutosave: ViewModifier {

  let name: String

  func body(content: Content) -> some View {
      ZStack {
          content
          FrameAutosaveView(name)
              .frame(maxHeight: 0)
      }
  }
}

extension View {

  func frameAutosaveName(_ name: String) -> some View {
    return self.modifier(FrameAutosave(name: name))
  }

}
While that’s a lot of support code, it’s simply responsible for injecting my custom NSView into the view hierarchy, allowing me to then do exactly what I had hoped for above:
ContentView()
    .frameAutosaveName("Main Window")
Amazingly, this mostly works: new windows are the same size as the last resized window, matching platform conventions!
Unfortunately, SwiftUI still seems determined to re-center the window after the frame has been set, so it’s not quite perfect. Also, looking closely, you may notice the solution doesn’t use any of the built-in platform support for frame autosaving (which just feels dirty); NSWindow.viewDidMoveToWindow isn’t called at the correct point in the application lifecycle to simply set the window’s autosave name and have everything work correctly.
I’ll keep experimenting, and hopefully a subsequent SwiftUI update will bring support for frame autosaving and I can retire this hack1. Until then, at least my windows remain the correct size.
The new dedicated macOS app (version 0.1.2) is available for download from the Releases section of the GitHub project. I’d love to hear your feedback.
Spherical Display
Disappointingly, only a few of the parts turned up last week, meaning progress was slow, but I moved things forwards as much as possible.
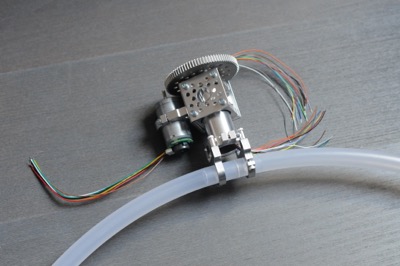
Starting to take shape
I soldered up the controller, attached the motor, added the slip ring, and put the hula hoop in place (all of which did turn up 🎉). Although non-functional, it makes for a great progress photo, giving a much better impression of how everything will fit together. Hopefully I’ll get to try the electronics soon.
Long-term, I anticipate that the display will be mounted to a scaffold, or lighting rig, but having none of that to hand, I ordered a cheap clothes rack on Amazon in anticipation of testing it in the coming weeks. I was also excited to find another example of this approach on YouTube from Sean Hodgins, someone I’ve recently started following based on some of his other projects.
You can find my workings on GitHub.
Website
When I was looking into the differences between MS-DOS and Mac OS audio a couple of weeks ago, I made a number of recordings of the different systems for later comparison and exposition. Having never hosted audio on my site before, working out how to do that for the inevitable write-up proved an entertaining distraction in an overly consistent week.
Thankfully, audio, like video, is incredibly well supported, so the required HTML is very simple, as shown by W3Schools' example:
<audio controls>
  <source src="horse.ogg" type="audio/ogg">
  <source src="horse.mp3" type="audio/mpeg">
Your browser does not support the audio element.
</audio>
As one of my goals with InContext is—where possible—to keep the amount of inline markup to a minimum, I’d like to avoid even this small amount of HTML, delegating to a template, or custom Markdown handling.
For video, I created a dedicated content handler and corresponding built-in Jinja2 extension which allows for some lightweight markup in the Markdown file, and subsequently inlines a known template:
{% extensions.video "shrimp.mov" %}
This works well, and I rely on it for all the videos on this site, but I have a couple of reservations:
sites must provide a
video.htmltemplate (using video-specific metadata keys), potentially making confusing for site authorsas with the image handler (prior to introducing the richer configuration mechanism), the video transform resolutions are hard-coded meaning it works well for my site, but is unlikely to serve other users well
Both of these issues suggest that there’s too much magic in InContext; magic that needs to be understood by site authors for them to be able to make the most of video handling. I’d like to avoid this when adding audio support, and set a better direction for video.
Since I didn’t have much time for grand plans last week, I started small, and decided to take advantage of the template Jinja extension I added to InContext a little while ago. This addresses some of the concerns by making the inline template explicit. For example,
{% template "audio.html" src: "content.mp3" %}
This tells InContext to inline the audio.html template at render time, passing the src variable into the environment. Of course, site authors still need to implement the template, but now they’re free to determine the template name themselves, making everything a lot more explicit.
For completeness, my audio.html looks like this (page is an implicit variable passed to every template at render time):
<audio controls>
  <source src="{{ page.abspath(src) }}" type="audio/mpeg">
Your browser does not support the audio element.
</audio>
And the rendered output looks like this:
(Ideally, there wouldn’t be any need to inline either HTML or Jinja code, but discussions around how to model media in Markdown seem to have been going on for a long time: the post on the CommonMark forum started in 2014, and other Markdown editors have taken their own approaches (e.g., Content Blocks). Going with a pure Markdown solution would also require the media-type specific template to be specified elsewhere.)
Looking at the W3Schools example above, they provide the audio as both MP3 and Ogg format. It would be great to be able to set up a transform to do that in a lightweight way, perhaps expanding the image handler definition in media.yaml to include other media formats, selecting on MIME type:
- where: type('audio/*')
  transforms:
  - convert("ogg", format='audio/ogg', sets=['formats'])
  - convert("mpeg", format='audio/mpeg', bitrate=128, sets=['formats'])

- where: type('image/*') and metadata(projection="equirectangular")
  transforms:
  - resize("large", width=10000, sets=["image"])
  - fisheye("preview-small", width=480, format="image/png", sets=["thumbnail", "previews"])
  - fisheye("preview-large", width=960, format="image/png", sets=["previews"])

- where: type('image/*') and (glob("*.heic") or glob("*.tiff"))
  transforms:
  - resize("large", width=1600, format="image/jpeg", sets=["image", "previews"])
  - resize("small", width=480, format="image/jpeg", sets=["thumbnail", "previews"])

- where: type('image/*')
  transforms:
  - resize("large", width=1600, sets=["image", "previews"])
  - resize("small", width=480, sets=["thumbnail", "previews"])
For the time being, these are just idle thoughts (it’s not urgent to generate Ogg format audio for the site), but I’d love to continue to improve the flexibility of media handling in InContext.
If you’d like to try out InContext for yourself, you can find it here.
-
Interestingly, it looks like SwiftUI is trying to do something with autosave frames as my user defaults are littered with auto-generated keys with names like
NSWindow Frame SwiftUI.NavigationView<Bookmarks.ContentView>-1-AppWindow-1🧐. ↩