Weeknotes #2
Having written so much for my inaugural weeknotes last week, I was apprehensive that there wouldn’t be much to write about this week. I need not have worried: inspired by some ideas from my friend Jonty, I happily found myself tinkering on a couple of new projects.
Spherical Display
About a year ago, Jonty seeded the idea of building a bright, LED spherical display; something for use at events like EMF. Life was pretty busy at the time so, after pondering the basics, it was relegated to the ever-growing project backlog. Fast-forward to a sleepless night last week, and I found myself trying to figure out exactly how to build one.
The plan is to spin a ring of LEDs (a DotStar strip inside a hula-hoop), relying on persistence of vision create the illusion of a spherical display. A quick Internet search reveals a number of similar projects: the Panorama Ball Vision which mounts the LEDs inside a transparent sphere, a couple of small project kits on Amazon (here and here), and even a large drone-mounted one by NTT DOCOMO (an unexpected way to encounter a co-conspirator from my Japanese cellphone days). There’s also a really detailed discussion on how to make a much smaller device on the Make: Magazine website.
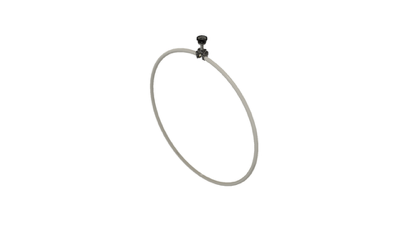
An early design showing the basic concept of a hula hoop hanging below a motor assembly
As I’m least experienced in mechanical engineering, it’s where I focused my initial design efforts—I figure if I can work out how to make a motor turn the hula-hoop, the rest will be easy 🙃. A few internet searches landed me on ServoCity which seemed to offer a pretty good selection of bearings and mountings so, in order to keep things focused, I limited myself to just the parts I could find there. Helpfully, they provide STEP files for most everything they sell, so I was able to try things out in Fusion 360 before ordering.
To achieve the goal of keeping the controlling electronics on the outside of the rotating hoop, I’m planning to use a slip ring to make the connections to the LEDs. This requirement pretty much drove the whole design, pushing me to use a 1" diameter tube as my axle so I can mount the slip ring inside it. I then built the motor and gearing assembly up around some suitably sized bearings:
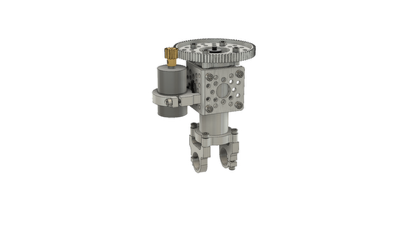
Fusion 360 render showing the motor assembly with a slip ring in the center of the shaft
As I write this, I realise I’ve probably got the gearing wrong: the motors I’ve been looking at have a rotational speed of 500 RPM (~8 Hz) meaning I’ll need to step them up to reach my target of 15 Hz1 (instead of stepping them down as I’m doing in the design above). I also suspect 15 Hz is overly optimistic and I might need to opt for a design with multiple hoops at different angles to each other, as seems common with some of the larger devices I’ve found online. Either way, I’ve ordered parts for a prototype and can hopefully use those to get a better feel for how everything fits together and let me get started on some of the electronics.
For the controller, Adafruit offer a DC Motor FeatherWing which should pair well with the HUZZAH32, their ESP32-based board. I had originally been thinking a Raspberry Pi would be perfect, but it’s not clear if it can offer sufficient realtime guarantees to both update the LEDs for display while monitoring the speed of the motor.
While there’s not much to see yet, you can find the project on GitHub, along with details of all the components I’m planning to use.
Tiny Cathode Ray Tube
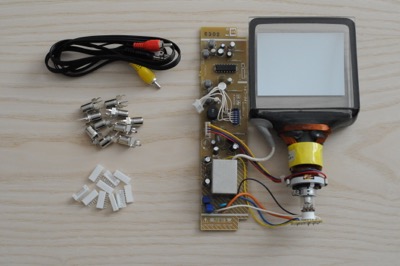
As a lover of all things absurd, I couldn’t resist picking up a couple of 4" black and white CRT displays when Jonty pointed them out on AliExpress. Although I’m not sure what to do with them yet (ideas range from a desk clock, to a cyberdeck-inspired portable computer), I put a little time into getting them working.
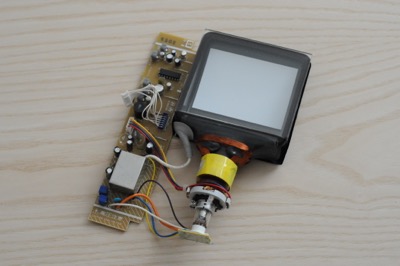
The only documentation I could find online (thanks to this eBay listing), suggests that the screens accept a composite signal and require 12v through a 7 position JST connector:
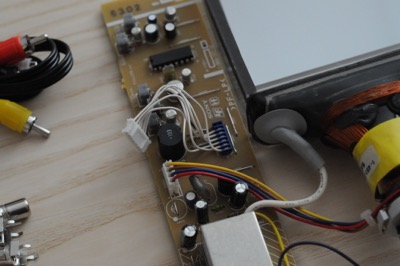
Since the Raspberry Pi supports composite natively, it seems like a great starting point2 so I broke out the callipers and set about identifying the connector which appears to be a JST B7B-PH-K-S. I also ordered a 3.5mm to 3 RCA cable and some RCA jacks to allow me to cable everything up:
This leaves power and, while I’m pretty sure I have a 12v power supply knocking around, I finally took the opportunity to order a bench power supply. On a friend’s recommendation I went for a Korad Technology KD3005D. Sadly it took longer to turn up than expected so I wasn’t able to try it out, but I hope to get basic video working by next week.
Website
I continue to tweak this website. Now that everything has a slightly cleaner structure, I’ve started restoring some of the elements I previously removed: the Software, Ideas and Game List pages are back, and I’m thinking about re-introducing a dedicated section for projects where I’ll try to pull together all the posts, links, and details about my various projects.
When restoring the Game List, I was able to take advantage of the new InContext site-specific plugins I talked about last week to quickly add a new convenience command for adding games to the list. It’s rewarding to see how little code something like this takes:
@incontext.command(
  "add-game",
  help="add a game to the site",
  arguments=[
    cli.Argument("title", help="title of the game"),
    cli.Argument("url", help="url of the game"),
  ])
def command_build(incontext, options):
  path = os.path.join(incontext.configuration.site.paths.games,
                      utils.safe_basename(options.title) + ".markdown")
  metadata = {
    "category": "games",
    "link": options.url,
    "platform": pick(PLATFORMS),
    "status": pick(STATUSES),
    "title": options.title,
  }

  with open(path, "w") as fh:
    document = utils.FrontmatterDocument(metadata=metadata)
    fh.write(frontmatter.dumps(document))
    fh.write("\n")
As always with software, there was some unexpected complexity: it seems this is the first time I’ve written an interactive plugin, so I had to tweak the way I was running my Docker container to add the --interactive, and --tty options to allow the plugin to receive input.
-
Based on a goal of 30 Hz and LEDs of both sides of the hoop. ↩
-
I also came across a pretty good discussion over at bitluni’s lab on how to output composite video using an ESP32, but that’s one for the future. ↩