Psion Bluetooth Keyboard: Keyboard Electronics
Part of an on-going series describing the process of turning a Psion Series 5 keyboard into a practical, day-to-day, Bluetooth keyboard.
Having got the basics of the keyboard working, the next challenge is to start the process of tidying up the circuit, designing a custom printed circuit board (PCB), and moving away from the prototype breadboard electronics.
Adding a Power Switch
Since the iPhone on-screen keyboard is only shown when no keyboard is connected, you quickly learn that it’s imperative to be able to easily power off any Bluetooth keyboard. Until now, I’d been relying on manually disconnecting the battery, but that won’t cut it long term.
The Adafruit Feather nRF52 includes support for this, with the documentation including the following note about the enable pin:
If you’d like to turn off the 3.3V regulator, you can do that with the EN(able) pin. Simply tie this pin to Ground and it will disable the 3V regulator. The BAT and USB pins will still be powered.
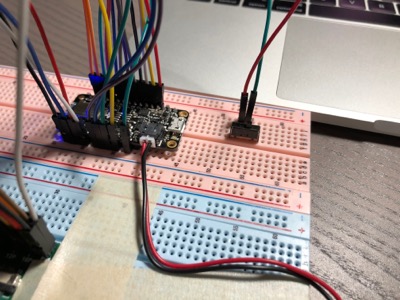
I tested that I’d understood this correctly by simply shorting this enable pin to ground on my breadboard, and was happy to see it powered down the board but still left the battery charging. Soon after, I added a slide switch to the breadboard:
Designing the Circuit
Autodesk EagleCAD seems to be the go-to software for PCB design and, like Fusion 360, is free for non-commercial use. It’s somewhat inscrutable, but there’s a good introduction on The Ben Heck Show, which helped me get started.
In EagleCAD, you typically design your circuit first, using the schematic file, and then switch over to a partially generated board file where you perform layout and routing. I started my schematic, and manually drawing connections between each and every one of the pins:
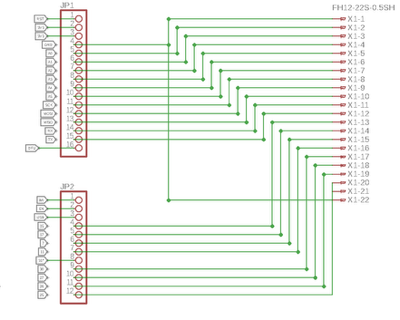
This quickly leads to a very complex schematic and, as I soon learned, is unnecessary: EagleCAD will automatically connect up wires with matching names. This allows for something much, much simpler:
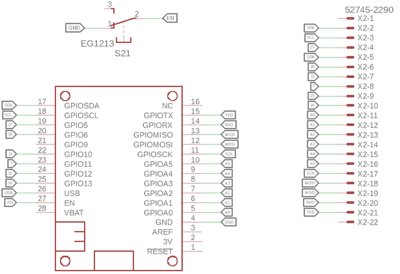
Separate parts and named connections
As you can see, I’ve also added the slide switch, and made use of the wonderful Adafruit component library1 (adafruit.lbr) which is included in EagleCAD by default. This includes a FeatherWing component, making it extremely easy to design a board to extend the Feather nRF52.
During the process, I learned the hard way (missing undo history, and out-of-sync board and schematic files) that it’s good to store EagleCAD files in git. I’d certainly recommend this to anyone getting started with EagleCAD.
Laying Out the Board
With the schematic nailed down, I went about the process of laying out the board. The board file presents a plan view of the PCB where you simply drag-and-drop components, adjust the shape of the board, place drill holes, and add silkscreen printing.
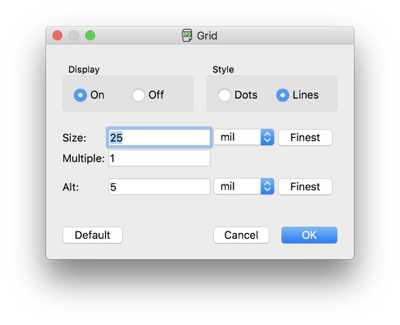
The grid is a crucial part of this process. Unfortunately, it’s not enabled by default, so the first thing I do is turn it on, and configure it with a ‘Size’ of 25 mil2, and an ‘Alt’ of 5 mil. I’ve also found that the default board shape isn’t aligned to the grid, so the easiest thing is to simply delete this and re-draw the outline.
Since this was my first PCB, I left routing to the auto-router and, while this gave me a few more vias than I suspect I need, I’m pretty pleased with the outcome:

Ordering the Board
I turned to OSHPark for manufacture. Ordering is just a matter of uploading the EagleCAD board file, and they generate previews immediately, helping to give me confidence in the design.
All told, the minimum order of three boards cost me $30 for a rush job. Had I been more patient, I could have saved myself $15. They turned up a week later, ready for soldering:
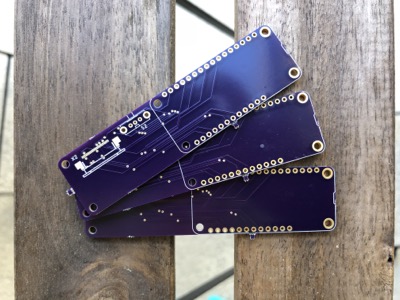
I already see a few things I’d like to improve for the next version:
- the silkscreen component names (X2, and S2) have been auto-assigned by EagleCAD and aren’t terribly helpful
- the orientation of the Feather headers means I need to sit the control board on the top, leading to unnecessary height
- I forgot to add a name and version to the board
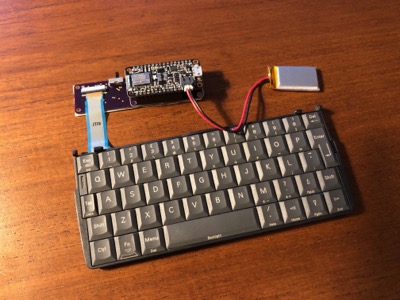
Assembly
Much to my surprise, placing the components on the board went surprisingly smoothly. Even my surface mount soldering worked first-time around—I’m starting to learn the benefits of a hot soldering iron, lashings of flux, and quick, deliberate action.
Finishing Up
The breadboard is already earmarked for another project, and I very much enjoyed stripping it down now the keyboard has found a new home:
-
I took a passing look at the ‘con-lsta’, ‘con-lstb’, and ‘pinhead’ libraries which provide default 100 mil header components, but ultimately these were less convenient than using Adafruit’s own components. ↩
-
From Wikipedia: “A thousandth of an inch is a derived unit of length in an inch-based system of units. Equal to 1⁄1000 of an inch, it is normally referred to as a thou /ˈθaʊ/, a thousandth, or (particularly in the United States) a mil.” ↩